Access your Virtual Computer
We will email you details to access your Virtual computer using Remote Desktop Connection.
- Important: Your IT department may have placed restrictions on your computer to prevent connecting to a Virtual Computer from another company. If you have difficulty in connecting to this remote Virtual Computer, please consult your IT department.
- You will be unable to undertake the training without access to the virtual computer. It is your responsibility to arrange access with your IT Department if required.
- Please keep your access details private and secure.
- The Virtual Computer will be unavailable after 11 pm on Sunday following the last Module of this training program.
If you are having further issues, please contact us via this form.
Download this page: PDF - 704 KB
Last Revised: 26 Nov 2021
Instructions for your Virtual Computer
Please access and test the remote Virtual Computer allocated to you as soon as possible. We will follow up in advance of training to make sure everything is working well.
Follow the steps listed below for connecting to your Virtual Computer.
Please use the log in details we have sent you to access the Virtual Computer.
1. Run Remote Desktop Connection on your local computer that uses Windows 7 or later. Windows 10 or 11 is preferred. You can do this via one of the following methods (these examples use a local Windows 10 PC):
Method 1
- Click the Windows Start icon on the taskbar and type "Remote Desktop Connection"
![]()
- then select the Remote Desktop Connection app to run it.

Method 2
- Alternatively, click the search box or the search icon on the taskbar, and
![]()
- search and select the Remote Desktop Connection app to run it:
![]()
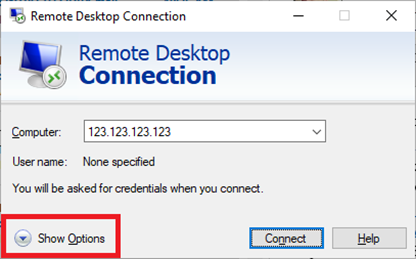
2. Click the Show Options button in the Remote Desktop Connection window:
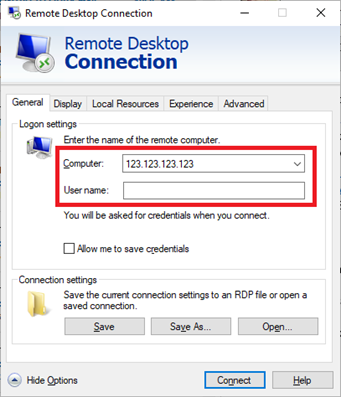
3. In the General tab, type in the IP address of the Virtual Computer and the User Name. These are given in the email you received from us.
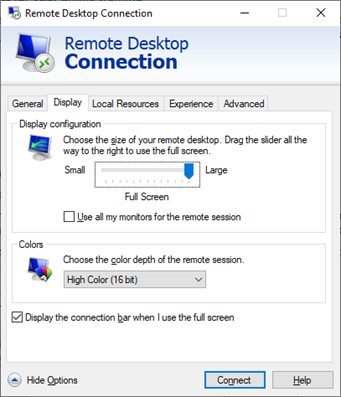
4. Go to the Display tab, set the Display configuration to Full Screen, and apply other settings as shown below:
5. Go to the Local Resources tab, click the Settings button in the Remote audio group:
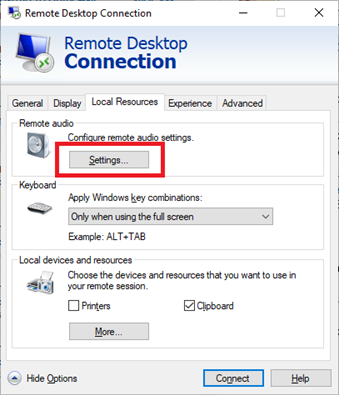
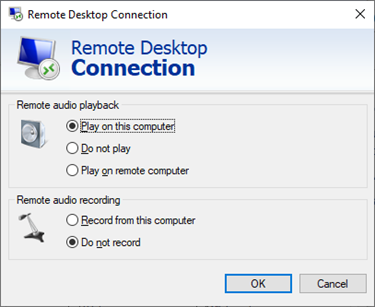
6. In the dialog that pops up, select Play on this computer for the option Remote audio playback, and select Do not record for the option Remote audio recording, and then click OK button to save these selections:
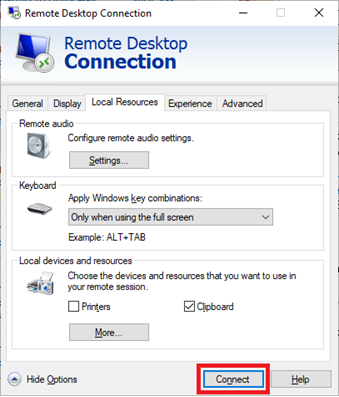
7. You will be back in the main Remote Desktop Connection dialog. At the bottom of the dialog, click the Connect button:
8. Type in the Password to sign in given in the email you received from us, and then click OK.
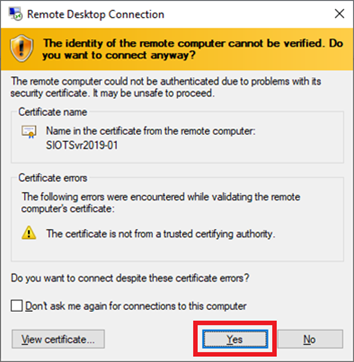
9. Click the Yes button for this warning message:
After you sign in the Virtual Computer for the first time, you might receive some warning messages that read “An app default was reset” (e.g. the one below) from the Windows system. Please ignore them.

Now you should be able to see the Desktop screen of the remote Virtual Computer. You can double-click the green SIDRA INTERSECTION 9 program icon on the Desktop to start the SIDRA software.
We recommend that you follow the procedure in the section Testing SIDRA INTERSECTION.
Signing out of your user account (without shutting down your Virtual Computer)
After you finish a training module, you do not need to shut down the Virtual Computer. You only need to sign out of your user account.
If you accidentally shut the Virtual Computer down, please let us know via this form and we will restart the Virtual Computer for you.
Include the following details:
- IP address of the Virtual Computer allocated to you
- your name and email address that are used to register for SIDRA training.
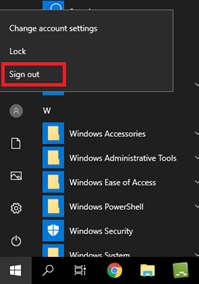
1. Click the Windows Start button on the bottom left of the Virtual Computer Desktop, and then click your user account icon.
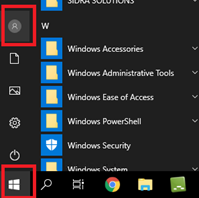
2. Click Sign out.
The SIDRA INTERSECTION project files for the training examples (sip9 extension) have been set up in a Folder named SIDRA SOLUTIONS in your default Documents folder on the Virtual Computer.
For your convenience, we will email you a link to download the SIDRA INTERSECTION project files prior to the program start date.
Copying files between Local Computer and Virtual Computer
You will keep using the same Virtual Computer for all training modules that you have registered for. Please note that all files in the Virtual Computer will be deleted after all your training modules are finished. We recommend that you copy your Project files down to your local computer.
Copying files from Virtual Computer to Local Computer
- Select the files on the Virtual Computer
- Right-click them, click Copy, or
press Ctrl + C buttons - Go to a folder on your Local Computer
- Right-click the empty area, click Paste, or
press Ctrl + V buttons
Copying files from Local Computer to Virtual Computer
Similarly, you can copy the files on your local computer and then paste them into a folder on the Virtual Computer.
The Virtual Computer will be unavailable after 11 pm on Sunday following the last Module.
It is recommended that you implement this testing procedure for SIDRA INTERSECTION 9 well in advance of the training workshop.
Please contact us if any of these tests do not produce the expected results, or if you have any other problems with accessing and testing the software.
SIDRA INTERSECTION User Interface
The SIDRA INTERSECTION user interface (with output displays open) is shown below.
The user interface is made up of several parts: At the top of the window is the Ribbon. On the Title bar, there is the SIDRA INTERSECTION icon on the left, the Quick Access Toolbar, the Project name (default name “Project1”), the program name (SIDRA INTERSECTION), Version number (9) and the licence type (PLUS or NETWORK).
The Ribbon underneath the title bar is organised into a set of tabs that represent the main functionality groups of the program. These are the File, Site, Network, Tools, Manage and Licensing tabs.
SIDRA INTERSECTION User Interface
The Project Pane on the left under the Site tab contains the SITES section at the top and the SITE INPUT section at the bottom.
The SITE INPUT section displays the input dialogs for the selected Site. Some input dialogs vary according to the Site type.
When the Site tab is clicked, Site Reports and Site Displays tabs will be opened. The ribbons of these tabs contain the commands for opening output reports and displays. Output will be available after the Process Site command is used and no processing errors are found.
Quick Testing of SIDRA INTERSECTION
Use SIDRA INTERSECTION to test basic program features as follows. The purpose is to test a few user interface commands to ensure they work and have a little practise in the meantime. Details of dialogs and displays are not important for this test.
- Start the program by double-clicking the program icon on your desktop. The user interface will be opened with an empty Project1 shown in the Project Bar on the left.
- Under the Site tab, in the Add New Site group, click Roundabout and then click
Roundabout (Unsignalised) 2-lane.
A Site named Site1 will appear under the Folder named General in the Project Pane.
- Click the Process button in the ribbon. This will process the Site data and create output reports and displays making the commands under the Site Reports and Site Displays tabs available.
- For the Selected Site:
- Click Site Layout in the ribbon. A picture with intersection geometry will appear.
- In the SITE INPUT section, click Lane Geometry. An input dialog will open. Close the dialog (click Cancel).
- Click the Site Reports tab at the top of the screen. Click Lane Summary in the General Reports command group of the ribbon. An output report will appear in the Display Pane.
- Click the Site Displays tab at the top of the screen. Click the down arrow next to Movement Displays in the Site Displays command group of the ribbon. Select the Displays you want in the Output Dialog and click OK. The selected output displays will appear in the Display Pane.
- Click File - Save. Specify the File Name and click Save.
- Click File - Close to close the Project.
This completes the steps for a quick testing of the software.
Watch these User Interface tutorial videos before the training.
Enquiries
Online
Please use our Contact Form for all technical support, sales, training and general enquiries.
Phone
Telephone: +61 3 9830 7123
Mobile: +61 423 024 372
Office hours
Monday to Friday
9.00 am to 5.00 pm AEST
Current AEST
